KTIW Radio Project Tech Details
Scroll DownFor the first time, my home airfield of Tacoma Narrows (KTIW) is having its air traffic radio streamed live to the Internet!
Listen To KTIW with LiveATC.net
Making it possible, in addition to the fine folks at LiveATC, are some hardware and software components I set up over the course of the winter, and in doing so, learned a lot about radio and streaming tech.
As you recall from the announcement post, the end-state we needed was my setup acting as a “feeder” station, pulling down Airband VHF from an antenna, piping it through a radio to an Internet endpoint as an MP3 stream:
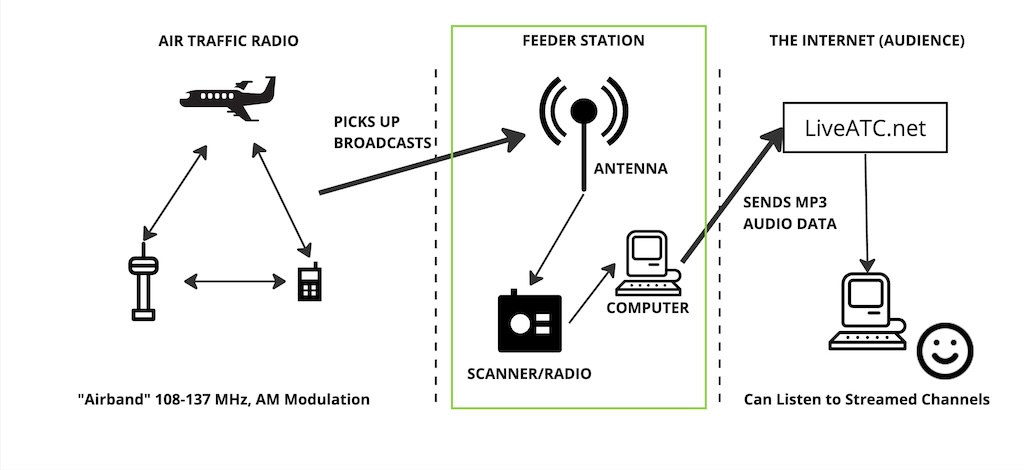
Looks easy, right? But a phased approach would make sense to maximize learning, and minimize “one-way” mistakes that would be costly to undo.
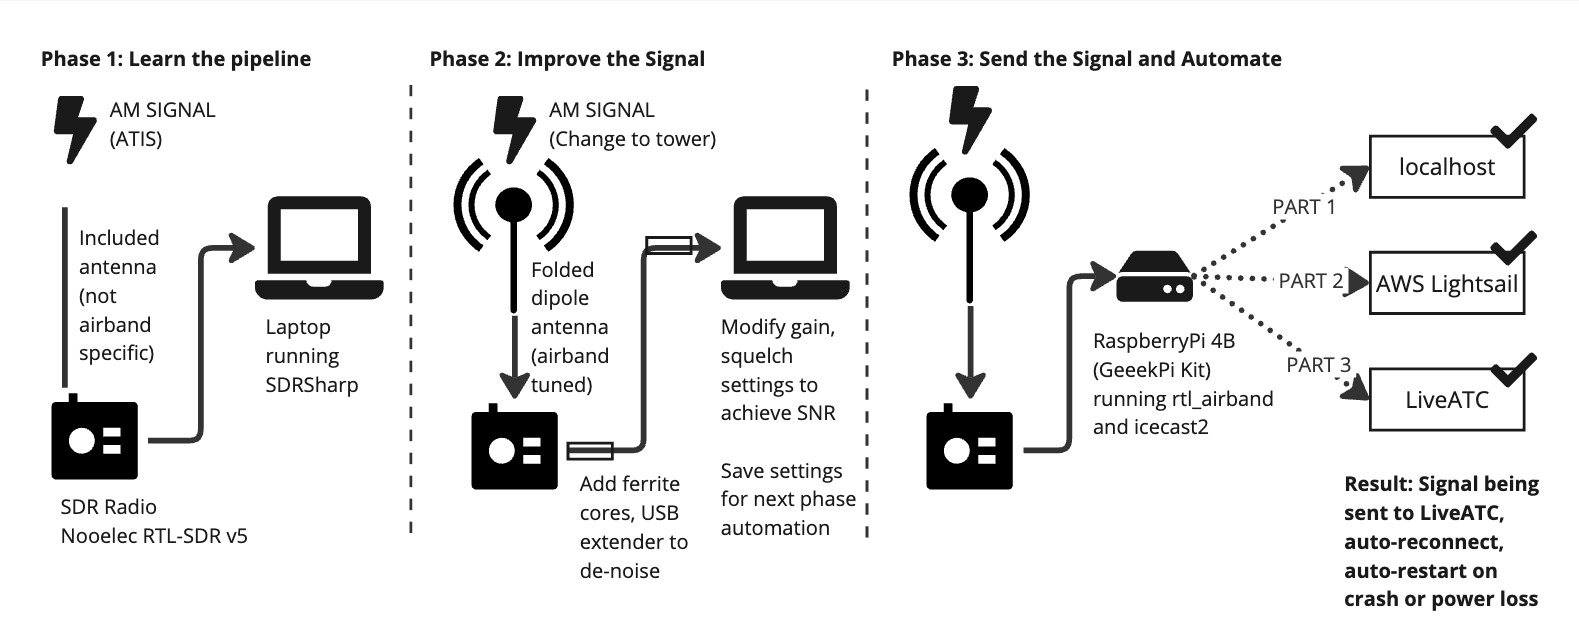
The Phase Map
Zooming in on the solution, let’s break it out into three phases:
- Learning the Pipeline (SDR Radio unit, laptop, any signal we can get)
- Improving the Signal (Dedicated antenna, dedicated frequency at maximum quality)
- Send the Signal and Automate (RaspberryPi unit, test locally first, then AWS, then LiveATC)
But there’s a phase before that, and it deserves a second to think about.
Phase 0: Risks and Reality
VHF radio is line-of-sight. To be a feeder station with any hope of a quality signal you need to be less than a critical physical distance away from the “source” location - in this case, Tacoma Narrows Airport.
I’m about 6 nautical miles away, in a slight depression, whereas Tacoma Narrows is on a hill about 300 feet above sea level. There are trees and some land between us. It wouldn’t matter how good my hardware is, if there was no hope of getting a signal due to physicality, this project would be over before it began.
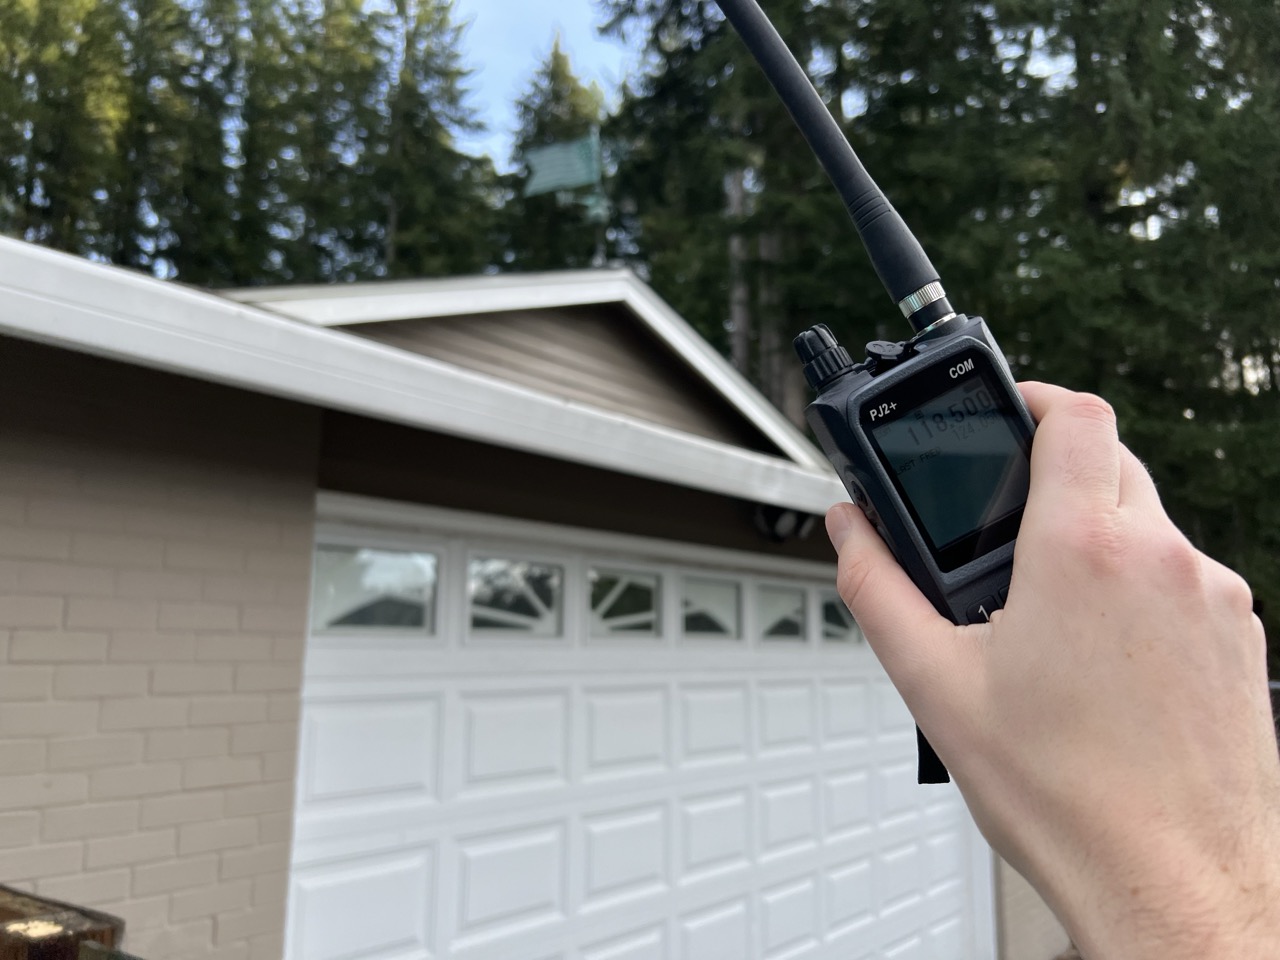
I dug out my portable aviation radio I bought for my Instrument Rating, and stood on the highest point I could (which is where I ended up putting the antenna), and listened for the Tacoma Narrows ATIS. It came through clear.
If I could get to that level of signal quality with my own hardware, we had a shot.
Phase 1: Learn the Pipeline
The LiveATC folks have an “Increase Coverage” Tutorial Page where I began my adventure. Here’s the recommendation I ended up using:
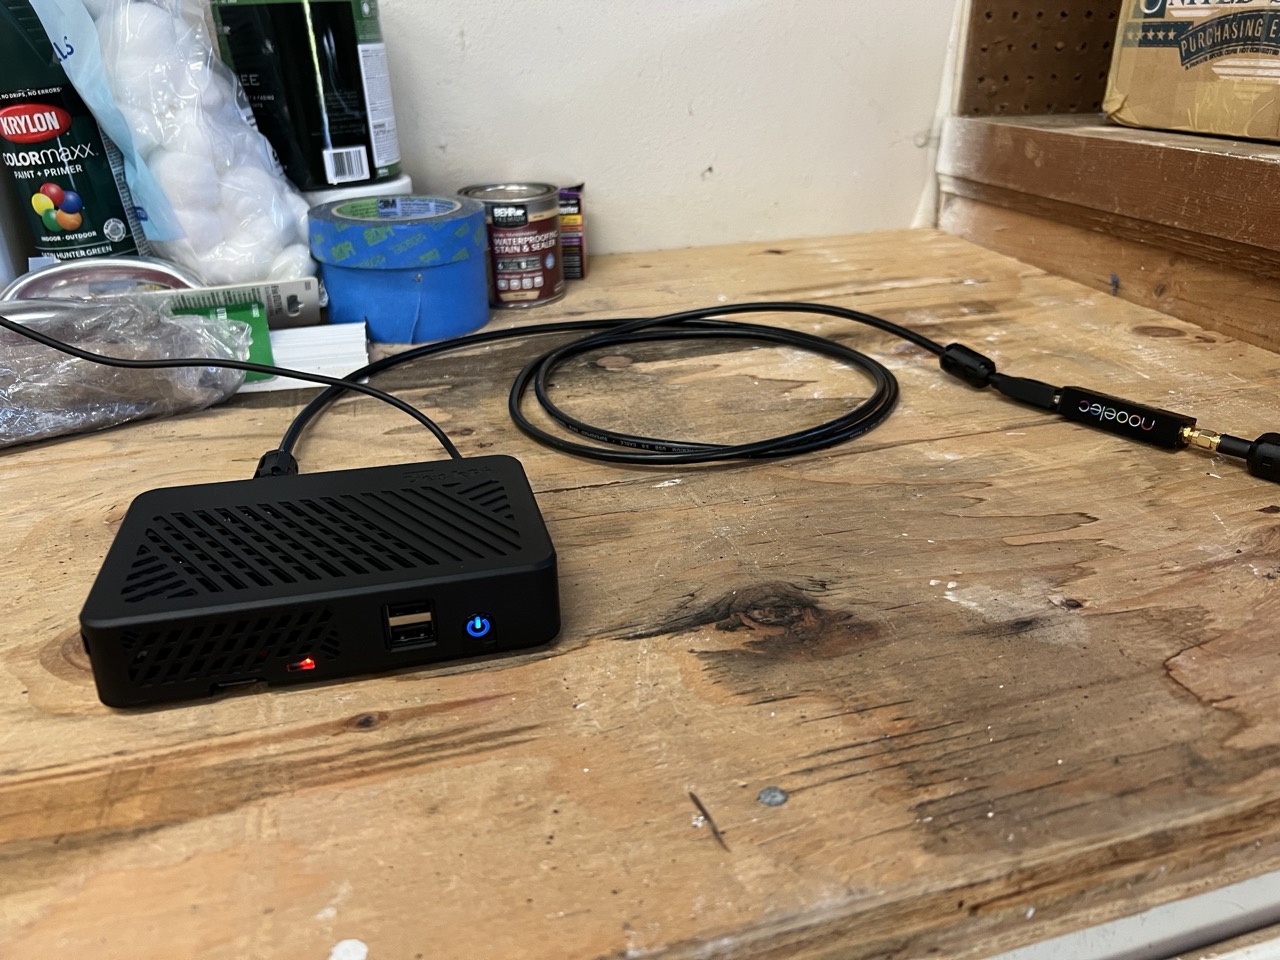
- A Nooelec NESDR Smart radio; I bought the v5 package from Amazon for $43.95. It came with some extendable antennas I could use to get … some kind of signal.
I already had a PC laptop I could plug it into, so I grabbed free SDR software - Airspy SDR-Sharp is good!
Propping the little antenna up on my gutters, I listened in and tried to make out anything on known frequencies like Tacoma Narrows ATIS, Seattle Approach, and others that I felt would have good signal to my location.
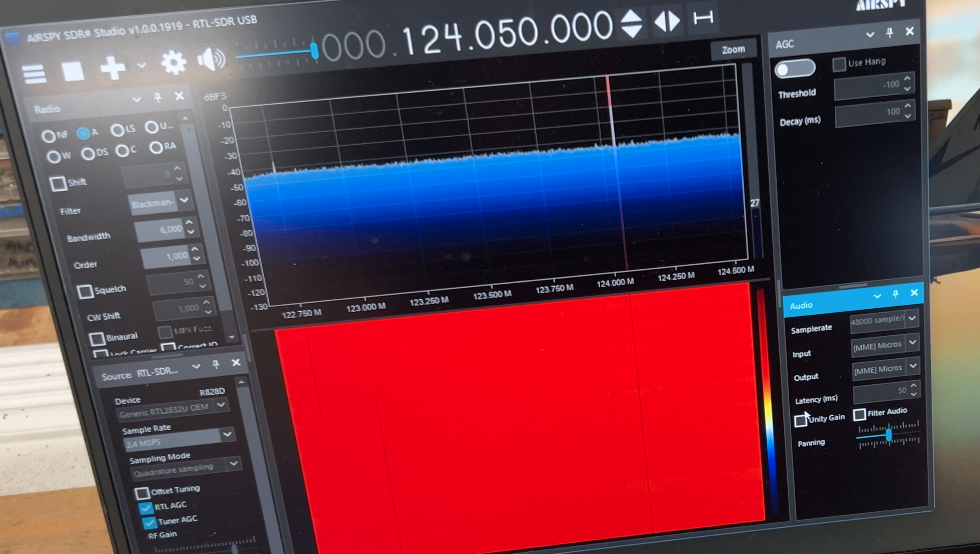
It didn’t go well. I couldn’t get anything on airband. Reason: the antenna wasn’t constructed ideally for airband frequencies, nor was it up high enough.
By checking a local AM music station, I confirmed the SDR radio was working and I could hear something. Enough for me to continue to Phase 2.
Phase 2: Improve the Signal
The LiveATC recommendation is a dedicated dipole antenna pre-tuned to the airband, and mounted up as high as you possibly can. I didn’t know how high I needed, but if I could stand on my roof with the handheld and hear ATC, at least that high. I purchased the following:
- A Centerfire Folded Dipole Antenna, “118-137 MHz Aircraft Band” option for $53.95
- A bunch of RG6 coax cable for $17.99 (the antenna uses RG6)
- A bunch of SMA Male to Male cable for $33.99 (the SDR radio uses SMA)
- RG6 to SMA adapter kit for $6.99
- USB extension cable for $14.95 (to get distance between the radio and laptop to minimize interference)
- Pack of ferrite cores for $9.99 (to snap on the coax cable at termination points to minimize interference)
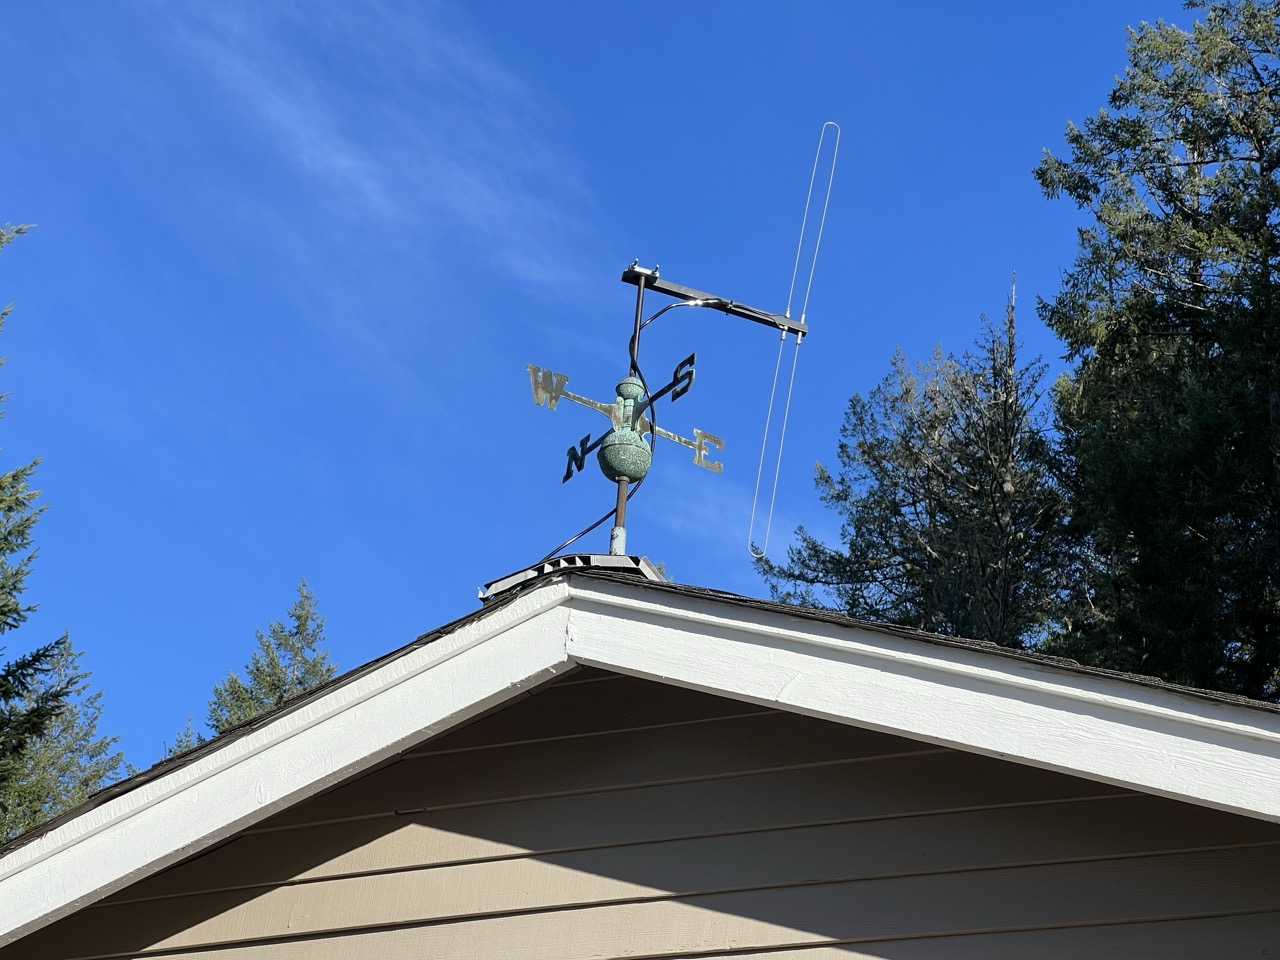
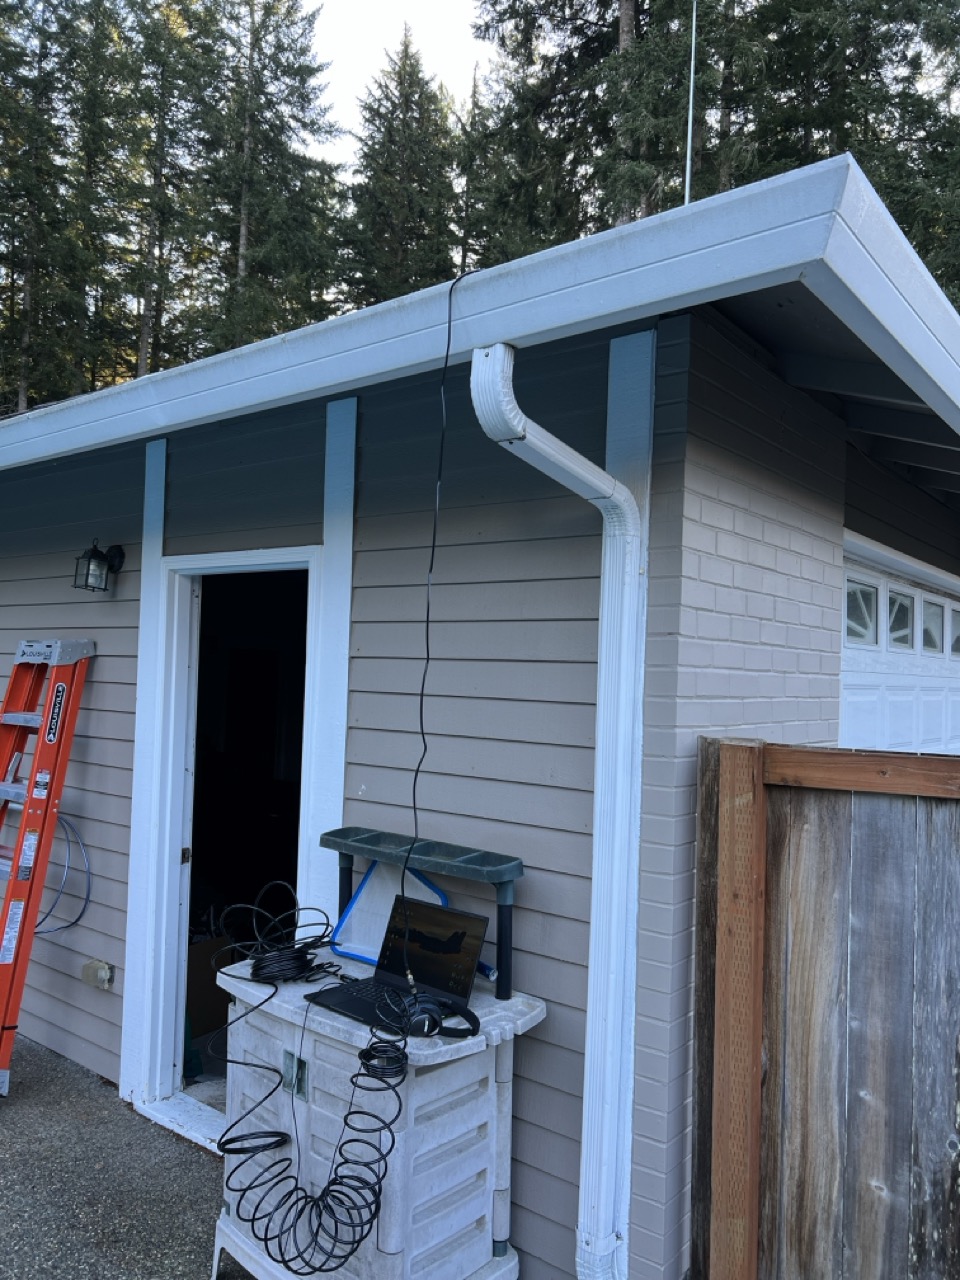
I asked a local handyman to repurpose the weather vane on top of my garage, and with an improvised mount he got the airband antenna up there, we ran the coax down and wedged it under the garage door. There’d be time for prettying it up later.
Results: I could hear the ATIS broadcast only at maximum gain, and then only faintly. Adding the extension cables, snapping on the ferrite beads didn’t help too much.
We needed more height. A lot more.
I enlisted the help of Multimedia Circuits and Systems, a local specialist in antennas. I described my project and he recommended a dedicated mount with some serious height. Because it had a secondary mount point, I also decided to spring for a Tempest weather system that would mount at the top.
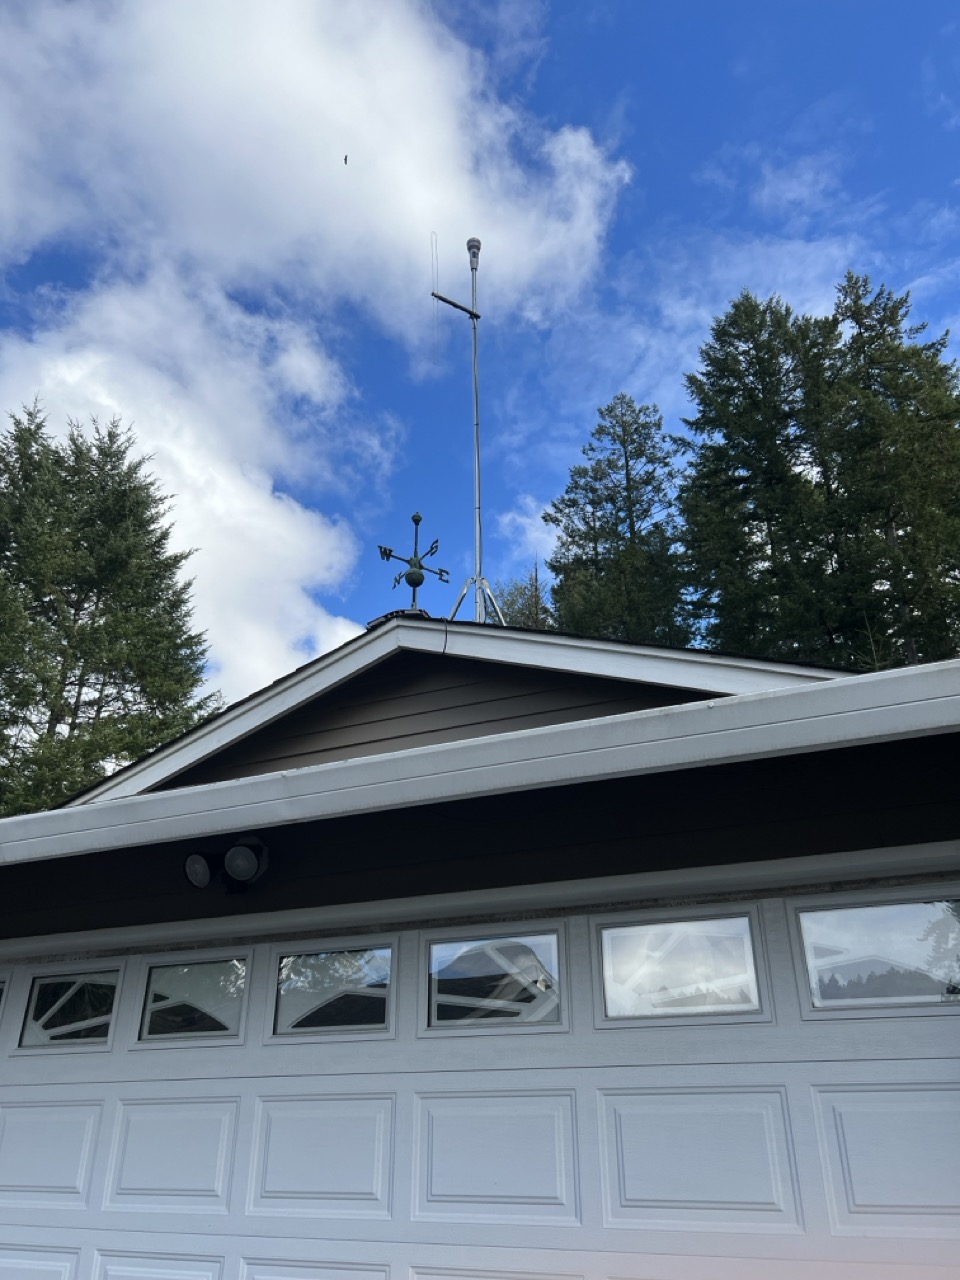
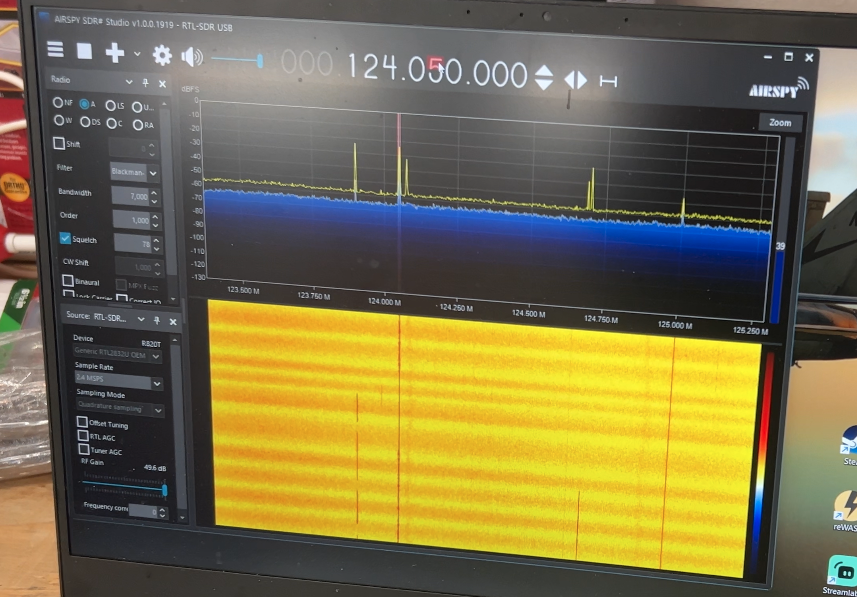
The antenna went from being ten feet off the ground to more than twenty feet, and the results were immediately improved. ATIS was coming through clearly, and gain could be reduced to remove noise.
The specialist also ran the cable through a nice new jack in the ceiling to clean up the look.

With good signal and a dedicated routing of cable, we were ready to move onto the final phase - getting the signal out to the world.
Phase 3: Send the Signal and Automate
I had enough information from my ATIS run throughs to guess at the gain levels I’d need to start operating the radio from the command-line. Reason: I wanted an automated solution, rather than my PC (which I was using for other stuff), I wanted to run this whole operation from a small, Raspberry Pi computer that would do the work. I’d be able to log into it on the command-line to reconfigure it but otherwise it’d just run “headless”, pulling down the signal and piping it to its eventual endpoint.
Here’s what I purchased for this final phase:
- A GeeekPi Raspberry Pi 4 8GB Kit for $149.99.
- A CyberPower ST425 UPS system for $53.95 (to keep it running if the power went out).
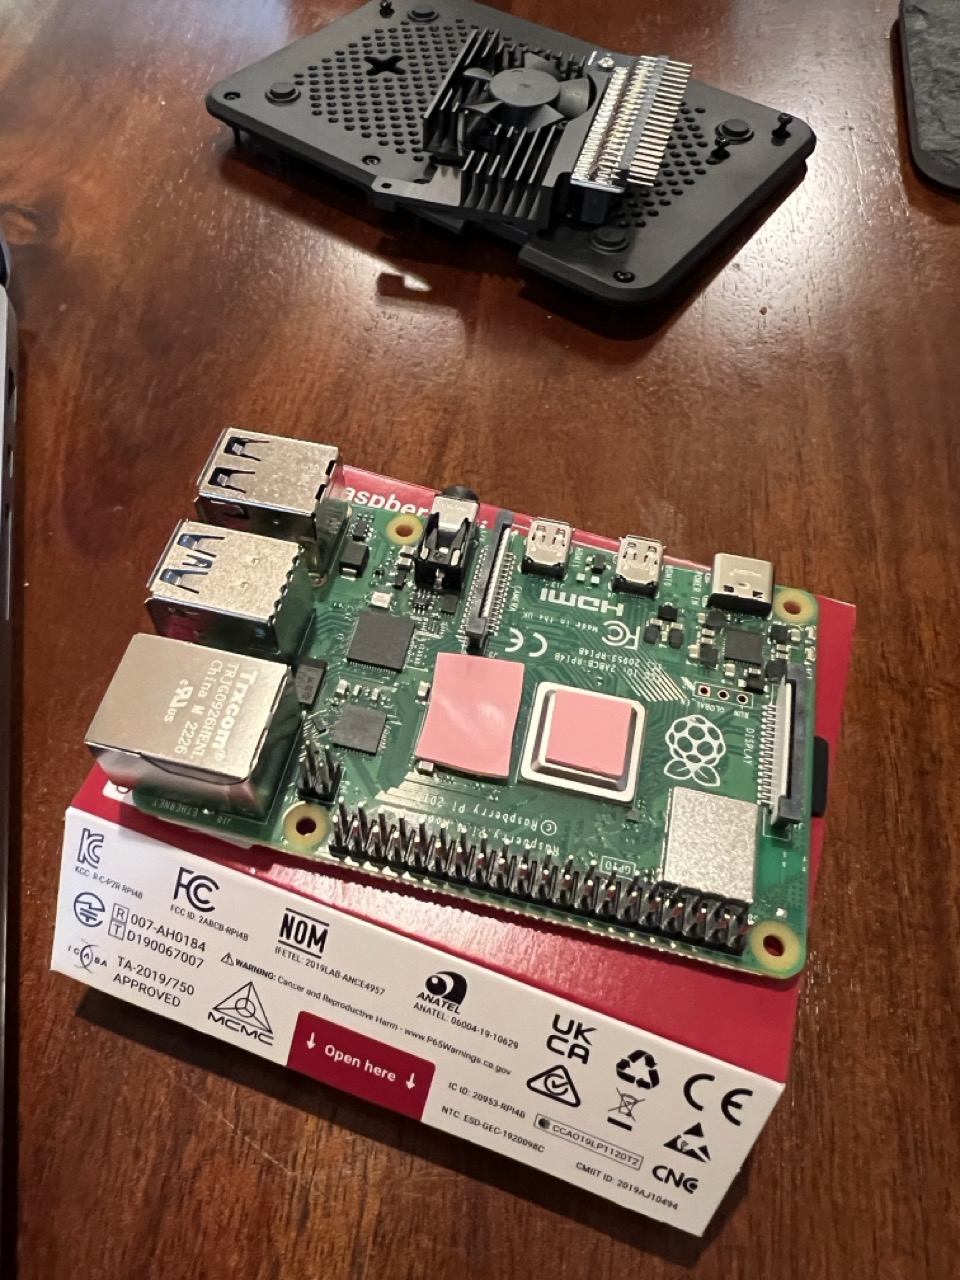
It was quick and easy to get the “naked” RaspberryPi in its case and working well. A tip I found out later: When using the DeskPi Lite case, it adds a requirement to physically push a power button to power the Pi when power is applied. If you don’t want that (I didn’t, I wanted boot up immediately on power application in case of a power outage), you can switch the little dip switch near the power button from “D” to “E”. Done.
I looked at a few command-line tools in the open source world and settled on RTLSDR-Airband, and for hosting the stream, I decided on Icecast.
One of the things you need to do when connecting up the radio via USB to the Pi is make the hardware accessible, this is a bit of Linux fiddling with Udev rules, check out this guide at Step 3 for the magic codes.
Then, a very easy quick guide for running RTLSDR-Airband on Pi 4 exists at FuzzThePiGuy - just be sure you install icecast2 first, I missed that step.
I took the transmission in steps. Manually running RTLSDR-Airband, I would pipe and listen in this order:
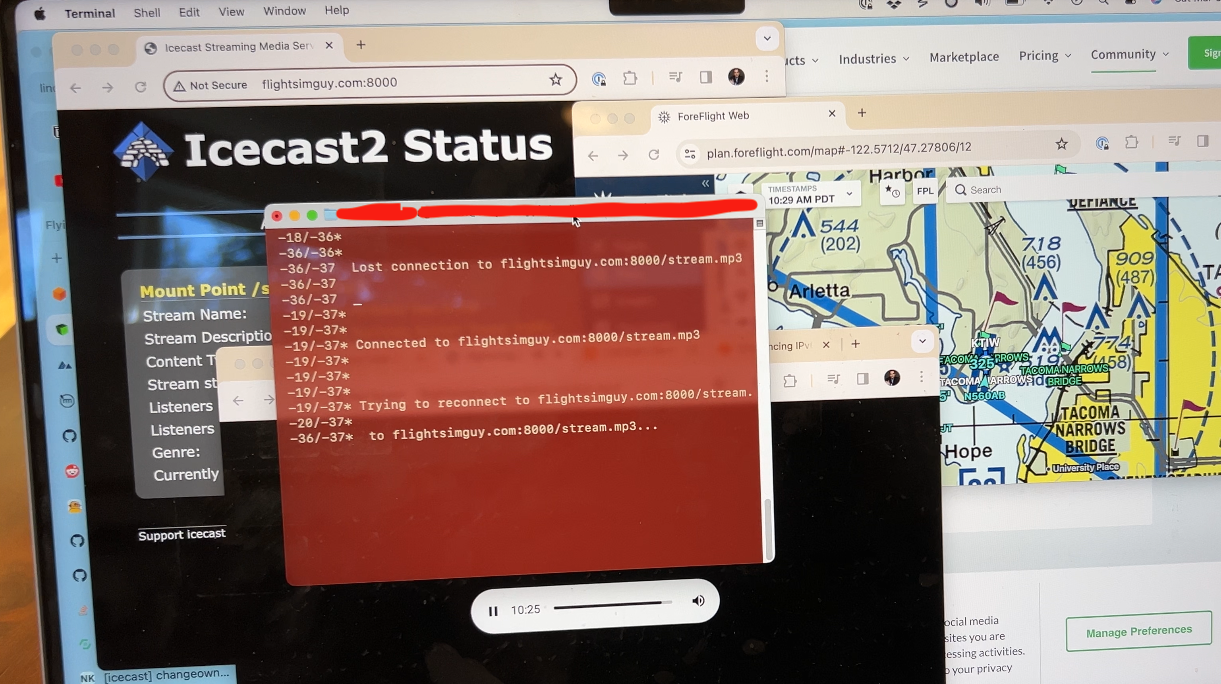
- First to localhost:8000 (I could hit it with my browser while on home Wifi)
- Then to the instance of AWS Lightsail I run flightsimguy.com on (I had to open port 8000, invited my friends to listen)
- Then, if all was working on AWS, I would set up automation so it’d run without me.
- At that point it was ready to be redirected to LiveATC.
Things looked good, a scan of top showed RTLSDR-Airband only taking about 20% of the CPU time. If you’re running it manually be sure to read the awesome RTLSDR-Airband docs carefully, you’ll see you need to killall the process to ensure you don’t accidentally starve resources.
The moment I was able to listen in on my own website endpoint and hear the MP3 stream was a magical one.
All that was left was to ensure the RTLSDR-Airband service would start up and run every time the RaspberryPi got power, the “Starting at Boot” instructions on the RTLSDR-Airband docs came through for me again here.
Finally, connecting up the Raspberry Pi’s power to the Uninterruptable Power Supply (UPS), along with the router at my house, would give me some runtime in the case of a power outage and insure no “blips”.
I monitored for another day, asked friends to tune in, and then asked LiveATC to monitor for quality to make sure it was up to their standards. When they listened in and were satisfied, it was an easy reconfiguration to push to their servers and turn off my AWS listening port.
Recap
A phased approach, starting with the riskiest/most expensive potential mistakes first, and only then moving onto operationalization, is an agile-like approach that emphasizes quick cycles of design, implementation, learning and tuning to home in on the proper solution when all variables aren’t yet known.
I made a bet it’d work well here, and I’m pleased with both the outcome and the learnings along the way. I’ve worked to provide a few key links to recommended hardware, software, and tutorials, but your particular solution might end up very different than mine. That’s OK! I’m excited to hear what you come up with and what you learn along the way.
I’m pleased to be operating a valuable service for aviation enthusiasts and open up the sounds of South Puget Sound aviation radio to the larger world.
Be sure to listen in, and enjoy!